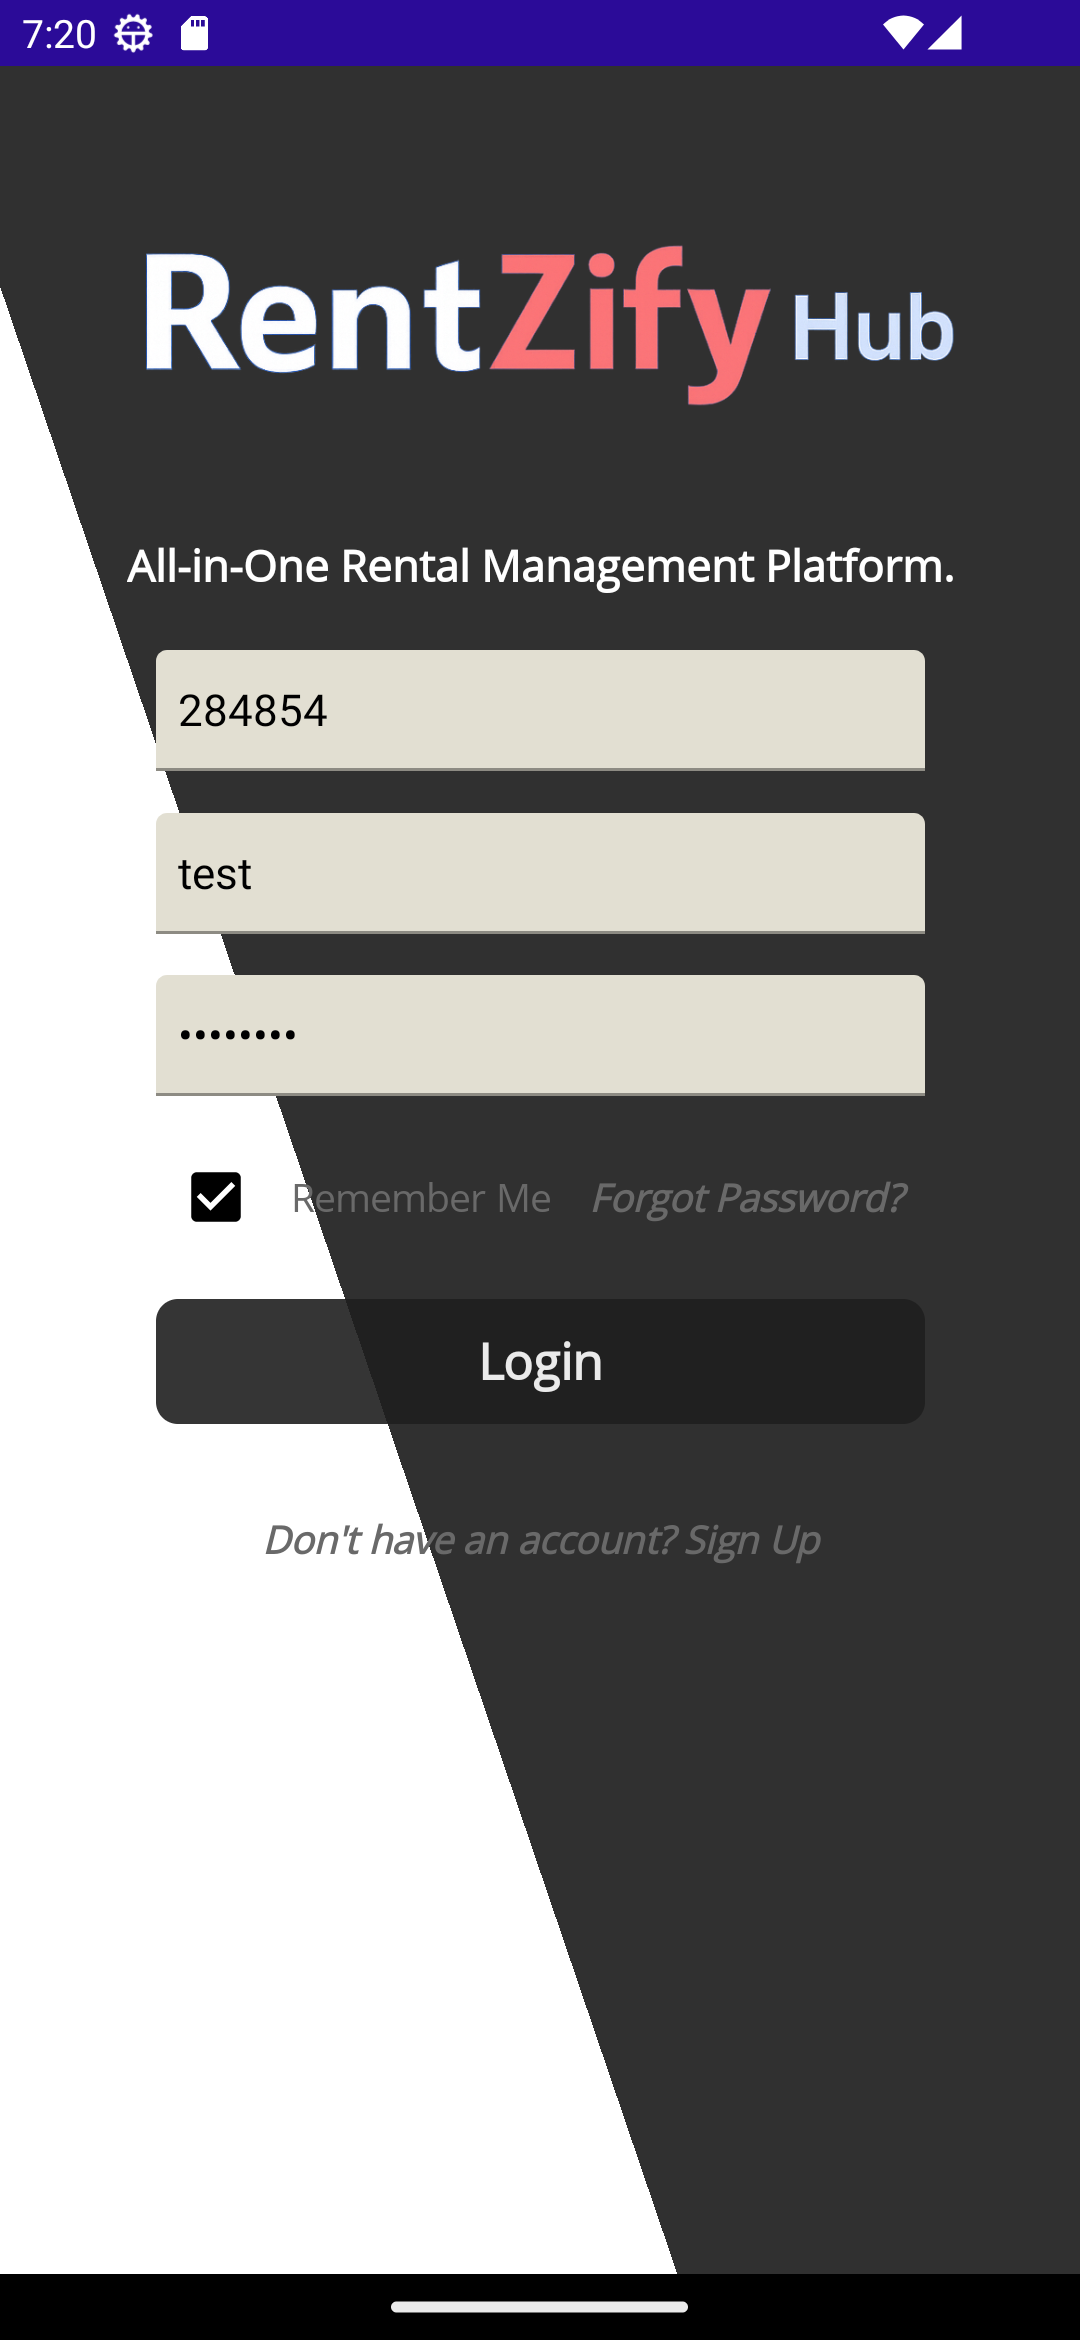
RentZifyHub Logo

User Guide

Login Page Screenshot

Login Page

The login screen allows users to securely access the RentzifyHub platform.

  • Company Code: The unique code identifying the company or property group.
  • Username: The user’s login identifier.
  • Password: Secure entry for authentication.
  • Remember Me: Keeps the user logged in on the device.
  • Forgot Password?: Navigate to password recovery options.
  • Login Button: Proceeds with authentication.
  • Sign Up: Opens registration page for new users.

Tip: Ensure the company code is correct, especially if managing multiple organizations.

Dashboard Screenshot

Dashboard

The dashboard provides a quick overview of rental performance, revenue, and navigation options.

  • Available Credits: RentZifyHub uses a credit-based system. Each active rental asset requires 10 pesos worth of credits for 30 days to remain enabled. Make sure to top-up your account to keep your rentals active.
  • Today's Insights:
    • Active Rentals: Displays the number of currently active rental units.
    • Current Month Expense: Total expenses recorded for the current month.
    • Today's Revenue: Income generated today, shown in green.
    • Current Month Revenue: Cumulative income for the current month.
    • Navigation Arrows: Use the left (◀) and right (▶) arrows to browse insights by day or month.
  • Navigation Icons:
    • Rentals, Reports, Reservations
    • Assets, Map, Tasks
    • Clients, Settings, Users
    • Add Credits, Help, Logout
Rentals Page Screenshot

Rentals Page

The Rentals screen lists all active and historical rental transactions, including asset and client details.

  • Rental #: Unique identifier for each rental record.
  • Asset: The name or label of the rented item.
  • Client: The person or entity renting the asset.

Navigation:

  • New, Update, Search, Dashboard
Edit Rental Screenshot

Edit Rental Mode

This mode allows for deeper interaction with a rental record.

  • Edit: Modify rental details.
  • Transaction: View related payments or adjustments.
  • Ledger: Review ledger summary by billing cycle.
  • Back: Return to Rentals list.
Rental Form Screenshot

Rental Form

The Rental Form is used to create or edit rental agreements, specifying the client, asset, and key rental terms.

  • Asset: Select the asset being rented (e.g., house, vehicle, equipment).
  • Client: Choose the client renting the asset.
  • Rental Type: Specify the mode of rental (e.g., hourly, daily, monthly).
  • Rental Rate: Rate charged per the rental type.
  • Start Date & Time / End Date & Time: Define the rental period.
  • Rental Status: Current status of the rental (e.g., active, completed).
  • Payment Status: Indicates if payment has been made.
  • Remarks / Special Instructions: Additional notes for the rental.
  • Deposit Amount: Amount required upfront as a security deposit.
  • Advanced Amount: Advance payment applied to the rental.

Bottom actions:

  • Save: Commit the rental details.
  • Cancel: Discard changes.
  • Dashboard: Return to the home panel.
Transactions Screenshot

Rental - Transactions

This screen displays all financial movements related to a rental.

  • Type: Payment or adjustment.
  • Date: Timestamp of transaction.
  • Amount: Value applied.

Controls:

  • Add, Back, Dashboard
Ledger Screenshot

Rental - Ledger

Daily billing breakdown with paid/unpaid status.

  • Period: Billing date.
  • Status: Paid or Unpaid.
  • Invoice: Amount billed.

Controls:

  • Email, Back, Dashboard
Assets Screenshot

Assets Page

Displays all items available for rental with their type and status.

  • Asset #: Identifier.
  • Name: Label of the item.
  • Type: Classification (e.g., land, equipment).
  • Status: Availability state.
Asset Form Screenshot

Asset Form

The Asset Form is used to register or update details of a specific asset such as a property, appliance, or vehicle.

  • Name: Asset name or identifier.
  • Description: Additional information describing the asset.
  • Location: Address or placement reference for the asset.
  • Status: Dropdown to set availability (e.g., Available, Rented, Inactive).
  • Price Hourly/Daily/Monthly: Cost of renting the asset based on time unit.
  • Photo: Upload image to visually represent the asset.
  • GPS ID: Optional field for mapping or tracking enabled assets. Contact our support for instructions on how to set up the GPS device. Currently, we have tested the SinoTrack device.

Bottom actions:

  • Back: Return to the previous screen without changes.
  • Dashboard: Navigate back to the main dashboard panel.
Clients Page Screenshot

Clients Page

List of all registered clients in the system.

  • Client #: Unique ID.
  • Name: Full name of client.
  • Email: Registered email address.

Menu:

  • New, Edit, Search, Dashboard
Client Form Screenshot

Client Form

The Client Form is used to create or update client profiles within the system.

  • Name: Full name of the client.
  • Email: Email address used for communication and system notifications.
  • Phone: Primary contact number for the client.
  • Address: Physical address or residence of the client.
  • Photo: Upload a client profile picture.
  • Identification: Option to upload an ID or verification document.
  • Status: Set the profile as active or inactive.
  • Contact Person: Person to reach in case of concerns, defaults to client name.
  • Contact Phone: Alternative or secondary contact number.
  • Notes: Free-text field for remarks, tags, or other references.

Bottom actions:

  • Save: Submit the form and create/update the client record.
  • Cancel: Discard changes and return to previous view.
  • Dashboard: Navigate to the main control panel.
Reports Page Screenshot

Reports Page

The Reports page allows users to generate and view various reports for rentals based on selected filters.

  • Start Date and Time: Define the beginning of the report period.
  • End Date and Time: Define the end of the report period.
  • Rental Name: Select a specific rental to filter the report.
  • Report Type: Choose the type of report to generate. Options include:
    • Asset Revenue Summary
    • Ledger
    • Accounts Receivable
    • Usage Rate
    • Maintenance History
    • Client Activity
    • Contract Status
    • And more...

Bottom actions:

  • Email: Send the generated report via email to Client and/or Owner.
  • View: Preview the report on screen in pdf format.
  • Dashboard: Return to the main menu.
Map View Screenshot

Map View

The Map View page displays all rental assets with their current locations, marked interactively on a Google Map.

  • Search Box: Filter map items based on asset names.
  • Fit All: Adjusts the map view to include all visible markers.
  • Asset Markers: Shows different icons for each asset type (vehicles, appliances, properties, etc.).
  • Tooltip: Tapping a marker displays details such as asset name and associated client.

Bottom navigation:

  • Dashboard: Returns to the main navigation panel.

Tip: Useful for quickly identifying asset distribution and verifying bookings on a map.

Settings Page Screenshot

Settings Page

The Settings page allows administrators to configure business-related credentials and details.

  • Business Name: Defines the name displayed in invoices and interface.
  • Email: Contact email for the business. Also used for notifications and system alerts.
  • Phone: Mobile number for official contact.
  • PayMongo Secret: Secure API key for enabling payment processing with PayMongo.

Bottom actions:

  • Save: Commit changes and update the configuration.
  • Cancel: Discard changes and revert to the previous state.
  • Dashboard: Return to the main dashboard panel.
Reservations Page Screenshot

Reservations Page

The Reservations page provides a calendar interface to schedule and manage reservations for rental assets.

  • Calendar View: Navigate by month and select specific dates to view or add reservations.
  • Time Slots: Displayed in a timeline grid, allowing detailed scheduling per hour.
  • Events: Reserved slots are marked clearly, with asset labels or short descriptions.

Bottom navigation:

  • Dashboard: Navigate back to the main dashboard.

Tip: Ideal for managing hourly bookings such as sports courts or appliances.

Reservation Form Screenshot

Reservation Form

This screen allows users to create a new reservation entry by filling out relevant booking information.

  • Name: Name of the person or event for the reservation.
  • Asset: Dropdown to select the asset to be reserved.
  • Email: Contact email associated with the reservation.
  • All Day: Toggle switch to block the entire day instead of specific hours.
  • Start Time & End Time: Define the beginning and end of the reservation period.
  • Repeat: Option to make the reservation recurring (e.g., daily, weekly).
  • Asset Photo: Optional image field for referencing or identifying the reserved item.
  • Notes: Additional comments or context for the booking.

Bottom actions:

  • Cancel: Abort the operation and return to the previous screen.
  • Save: Submit and store the reservation details.
Tasks Page Screenshot

Tasks Page

The Tasks page provides a list of maintenance and operational tasks assigned to assets or units.

  • Task #: Unique identifier for each task entry.
  • Date: Scheduled date for the task to be performed.
  • Name: Short description or label for the task.

Bottom actions:

  • New: Create a new task entry.
  • Edit: Modify details of an existing task.
  • Search: Locate tasks based on criteria such as date, name, or ID.
  • Dashboard: Return to the main application panel.

Tip: Keep task names clear and consistent to make filtering and completion tracking easier.

Task Form Screenshot

Task Form

The Task Form allows users to create or update a task related to a rental asset.

  • Asset: Dropdown to assign the task to a specific rental unit or item.
  • Assignment Date: Date when the task is scheduled or created.
  • Task Name: Short label identifying the task.
  • Description: Additional details about the task.
  • Expense Amount: Estimated or actual cost related to the task.
  • Assigned To: Person responsible for completing the task.
  • Assigned Contact Phone/Email: Contact information for the assignee.
  • Priority: Set the urgency level (e.g., Low, Medium, High).
  • Status: Track task progress (e.g., Pending, In Progress, Completed).
  • Completion Date: Expected or actual finish date for the task.

Bottom actions:

  • Save: Store the entered task information.
  • Cancel: Discard the changes and exit the form.
  • Dashboard: Navigate back to the main panel.
Users Page Screenshot

Users Page

The Users page enables management of login credentials and user roles within the system.

  • Administrator Login: Fields to set or update the administrator’s username and password.
  • Username: Login name for accessing the platform.
  • Password: Hidden input for setting secure credentials.
  • Confirm Password: Re-enter the password for validation.

Users Login Table:

  • Displays a list of existing users along with their username, email, and full name.

Bottom actions:

  • New User: Add a new user profile.
  • Edit User: Modify an existing user’s details.
  • Dashboard: Return to the home panel.
User Form Screenshot

User Form

This form is used to create or update a user profile in the RentzifyHub system.

  • Username: Identifier used for login.
  • Email: Email address associated with the user.
  • Password: Login credential for user access.
  • Full Name: Display name of the user.
  • Status: Dropdown to mark user as active or inactive.

Access Controls: Enable or restrict access to modules:

  • Asset Access, Client Access, Rental Access
  • Report Access, Setting Access, User Access
  • Reservation Access, Map View Access

Bottom actions:

  • Cancel: Exit without saving changes.
  • Dashboard: Return to the main dashboard.